Amy: Rather than use a traditional stencil, I decided to mask the bloom.
Super easy smeasy and you can use a sticky note, stamp the image and fussy cut it out. The beauty of the sticky note is that you can store the mask with the stamps when you're done!
Yvonne: I love to mask and mask and my stencils come out to play a lot! *winks*
I actually wanted to reverse image of the stencil. So I started by misting on my base white cardstock. I chose two random spots instead of misting on the entire stencil. This helps to create different looks for your background. Then I pressed another piece of white cardstock on the wet stencil for the effect I wanted. [The first cardstock I sprayed on could be used on another project.]
Next I laid the photos in the centre and then added the fussy cut leaves with cute birds to "ground" the photos.
I felt that the patterned paper banner was too "flat" so I added ribbon scraps in a contrasting colour and also added some baker's twine.
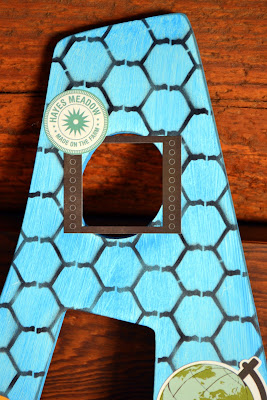
Julie: For my project, I took a white wood "A" that my friend Joni gave me (my son's name is Adam) and I painted it blue --- then once that was dry, I took a honeycomb mask and used my friend's Airbrush machine and her Copic markers to airbrush my stencil on!!! Airbrushing with Copic (or any other alcohol based markers) markers is AMAZINGLY fun!! It dries instantly!!! No waiting like you do for misting or paint!! I LOVE IT!!!!!
____________________________________________
Use your imagination to get the most out of your stencils OR look to your existing supplies as templates. Above all, have fun! If you were inspired to create something based on the stencil trend, please upload your creations to our Flickr pool OR leave a link in the comment section. You have until 12 October to be in the running for some RAKs. :)
Here are today's sketches.
 |
| Card sketch |
 |
| Layout sketch |
See you tomorrow for Day Four: Punches and diecuts! :)


14 comments:
Gorgeous projects by all three of you...i am so amazed by the different ways you have used the stencils to create your beautiful work... your post's teach me something new everyday:)
You are all SO clever and talented!! LOVE this challenge. I'm going to try to get going on these soon!!
Geez..these are awesome!! Love the honeycomb on Yvonne's and Amy's effect is amazing!! And Julie...Wow... I knew you'd be making that A into something so gorgeous... so glad I grabbed that at a yard sale for you!!! (best 25 cents ever!!)
this site is getting hot...and warmer each day eh... im getting all excited... those projects are truly inspiring!!! I must make time to play along...thanks ladies for sharing the tips.... hugs..xoxo
I have masks and don't use them nearly enough--thanks for the ideas.
Beautiful! I hardly ever use my stencils. It's fun to see such great inspiration.
awesome inspiration ladies!!!!! :)
Love your sketch Yvonne! Great work girls!!
you ladies came up with such inspiring projects everyday! love those!
Amy and Yvonne,... your projects, as always are AMAZING!!!!! Love them!!!!!
I never thought of masking as a stencil, but DUH of course it is! This really opens it up for me - but I'm still going to try pulling out my ancient plastic stencils from my stash & see how they hold up to misting :) Love all the fun stuff you guys created - that A is too cool!
I love stencils as you know! Great challenge & inspiration!! Here is mine http://helentilbury.blogspot.com/2012/10/dream-come-true-layout-once-upon-sketch.html
I always enjoy seeing your projects and I love to stencil! thanks for the inspiration!
YIPPEE!!! I LOVE stencils! Mine are pretty subtle on this layout, but there just the same ;)
This one won't count for the giveaway, since it's after the deadline, but I wanted to share it anyway. Thanks for the inspiration to complete a few more pages!
http://hisglorygirl.blogspot.com/2012/10/two-more-for-cool-chicks.html
Post a Comment